[Two Pointers + 프록시 패턴 + 테스트 코드] Leetcode 88. Merge Sorted Array
https://leetcode.com/problems/merge-sorted-array/?envType=study-plan-v2&envId=top-interview-150
Merge Sorted Array - LeetCode
Can you solve this real interview question? Merge Sorted Array - You are given two integer arrays nums1 and nums2, sorted in non-decreasing order, and two integers m and n, representing the number of elements in nums1 and nums2 respectively. Merge nums1 an
leetcode.com
https://github.com/fineman999/algorithm_java/tree/main/src/test/java/org/leetcode/mergesortedarray
https://github.com/fineman999/algorithm_java/tree/main/src/main/java/org/leetcode/mergesortedarray
1. 시작하기 앞서...
일 끝나고 집에 도착하면 피곤해서 공부를 안하고 나태해지기 마련인데 마침 원티드에서 프리온보딩을 한다고 하기에 덜 게으른 사람이 되고 싶어서 신청하게 되었다. 그래서 발길을 근처에 있는 스터디 카페로 자리를 옮겼다.
첫 번째 과제로 알고리즘 문제를 푸는 거였다. 모두 LeetCode에서 문제를 푸는 것이었다. 예전에 한창 할때 약 두달만에 백준 플레티어를 찍었지만 안하니까 잊혀지게 되었다. 또한 그때 당시에는 파이썬으로 하여서 오직 문제를 풀기용으로만 풀었던 것 같다.
그래서 이번에는 좀 더 색다른 방법으로 접근하려고 한다.
알고리즘과 더불어 테스트 코드를 작성하는 것이다. 또 추가로 디자인 패턴을 하나씩 공부함으로써 적용하면 디자인패턴과 테스트 코드 작성에 능숙해지지 않을까?(바람)
2. 알고리즘
nums1의 int 배열과 nums2의 int 배열이 있다. 감소하지 않는 순서로 정렬된다.
nums1의 길이는 m + n
nums2의 길이는 n으로 지정된다.
최종 배열로 함수로 반환되지 않고 nums1 내부에 저장되어야 한다.
2.1 코드
Solution Class
public class Solution implements Subject{

    @Override
    public void merge(int[] nums1, int m, int[] nums2, int n) {

        int p1 = m - 1;
        int p2 = n - 1;

        int p = m + n - 1;

        while ((p1 >= 0) && (p2 >= 0)) {
            nums1[p--] = (nums1[p1] < nums2[p2]) ? nums2[p2--] : nums1[p1--];
        }

        System.arraycopy(nums2, 0, nums1, 0, p2 + 1);
    }
}
p1과 p2는 각각 값이 마지막에 존재하는 곳부터 시작할 인덱스 요소이다.
p는 nums1 배열의 마지막 요소이다.
while 문과 삼한 연산자를 통해 문제를 풀 수 있다.
만약 nums1의 인덱스 요소가 nums2의 인덱스 요소보다 작을 경우 nums2의 인덱스 요소를 nums1의 p번째 인덱스 요소에 넣고 각각 -1씩 감소한다.
위의 반복문이 끝난 후에, nums2 배열에 남아있는 원소들이 있는 경우 nums1에 복사하게 된다.
2.2 테스트 코드
class ConstraintsTest {

    Subject solution = new Solution();
    Subject constraints = new Constraints(solution);

    static Stream<Arguments> generateData() {
        return Stream.of(
                Arguments.of(new int[]{1, 2, 3, 0, 0, 0}, 3, new int[]{2, 5, 6}, 3, new int[]{1, 2, 2, 3, 5, 6}),
                Arguments.of(new int[]{1}, 1, new int[]{}, 0, new int[]{1}),
                Arguments.of(new int[]{0}, 0, new int[]{1}, 1, new int[]{1})
        );
    }
    @ParameterizedTest
    @MethodSource("generateData")
    @DisplayName("merge 메서드는 nums1 배열과 m, nums2 배열과 n 을 받아 true 를 반환한다.")
    void merge(int nums1[], int m, int nums2[], int n, int expected[]) {

        constraints.merge(nums1, m, nums2, n);
        assertThat(nums1).isEqualTo(expected);
    }
}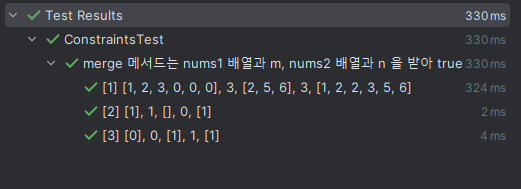
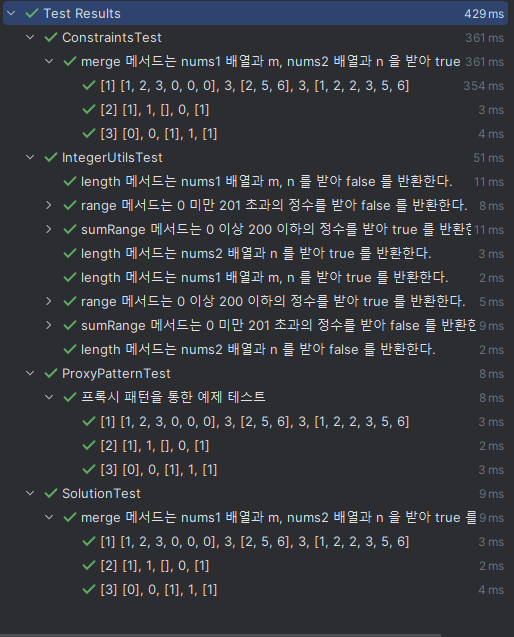
테스트 코드를 통과한 결과를 볼 수 있다.
3. 제약 조건

LeetCode 사이트에는 위와 같이 제약 조건이 따로 있는 걸 확인 할 수 있었다. 그럼 정적 타입 클래스를 만들어서 제약 조건에 만족하면 true를 반환하는 class를 작성해보자.
IntegerUtils Class
public final class IntegerUtils {
    private IntegerUtils() {
    }
    public static boolean range(int length) {
        return length >= 0 && length <= 200;
    }

    public static boolean sumRange(int m, int n) {
        return m + n >= 0 && m + n <= 200;
    }

    public static boolean length(int[] nums1, int m, int n) {
        return nums1.length == m + n;
    }

    public static boolean length(int[] nums2, int n) {
        return nums2.length == n;
    }
}
값을 변경할 값이 없으므로 해당 클래스는 불변 클래스로 지정하였다.
또한 static 메소드만을 이용하기 때문에 private 생성자를 이용하여 인스턴스를 막게 만들었다.
4. 디자인 패턴 - 프록시 패턴
Constraints Class
public final class Constraints implements Subject {
    private final Subject target;

    public Constraints(Subject target) {
        this.target = target;
    }

    @Override
    public void merge(int[] nums1, int m, int[] nums2, int n) {
        check(nums1, m, nums2, n);
        target.merge(nums1, m, nums2, n);
    }

    private void check(int[] nums1, int m, int[] nums2, int n) {
        checkRange(m);
        checkRange(n);
        checkSumLength(m, n);
        checkLength(nums1, m, n);
        checkLength(nums2, n);
    }

    private void checkRange(int number) {
        if (!range(number)) {
            throw new IllegalArgumentException("number is out of range");
        }
    }

    private void checkSumLength(int m, int n) {
        if (!sumRange(m, n)) {
            throw new IllegalArgumentException("nums.length != length");
        }
    }

    private void checkLength(int[] nums, int length) {
        if (!length(nums, length)) {
            throw new IllegalArgumentException("nums.length != length");
        }
    }

    private void checkLength(int[] nums, int m, int n) {
        if (!length(nums, m, n)) {
            throw new IllegalArgumentException("nums.length != length");
        }
    }
}
위와 같이 merge 메소드에서 우리가 원하는 로직이 실행된다.
자세히 보면 아까전 Solution Class와 같은 인터페이스를 상속 받는 것을 확인할 수 있다.
Subject Class
public interface Subject {
    void merge(int[] nums1, int m, int[] nums2, int n);
}
ProxyPattern Class
public class ProxyPattern {
   private final Subject solution;

    public ProxyPattern(Subject solution) {
        this.solution = solution;
    }

    public void merge(int[] nums1, int m, int[] nums2, int n) {
        solution.merge(nums1, m, nums2, n);
    }
}
의존성 객체 주입
class ProxyPatternTest {
    static Stream<Arguments> generateData() {
        return Stream.of(
                Arguments.of(new int[]{1, 2, 3, 0, 0, 0}, 3, new int[]{2, 5, 6}, 3, new int[]{1, 2, 2, 3, 5, 6}),
                Arguments.of(new int[]{1}, 1, new int[]{}, 0, new int[]{1}),
                Arguments.of(new int[]{0}, 0, new int[]{1}, 1, new int[]{1})
        );
    }
    @ParameterizedTest
    @MethodSource("generateData")
    @DisplayName("프록시 패턴을 통한 예제 테스트")
    void example1(int nums1[], int m, int nums2[], int n, int expected[]) {
        Subject solution = new Solution();
        Subject constraints = new Constraints(solution);
        ProxyPattern proxyPattern = new ProxyPattern(constraints);

        proxyPattern.merge(nums1, m, nums2, n);
        assertThat(nums1).isEqualTo(expected);
    }
}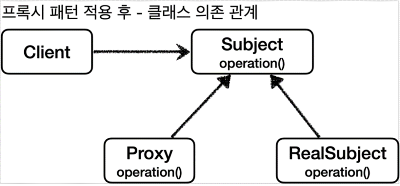
ProxyPattern(Client) 클래스는 Subject 인터페이스를 생성자 주입으로 받는다.
여기서 ProxyPattern은 어떤 구현체 클래스를 받는 지 모른다. 오직 Subject 인터페이스를 통해 merge 메소드에 있는 로직이 실행 된다.
이것을 이용하여 예외 처리 로직과 실제 구현 로직을 분리 시킬 수 있다. 중간에 Constraints Class를 두어 접근 제어를 할 수 있게 한다. 만약 문제가 발생하면 Constraints class를 통해 예외를 던지고 실제 객체는 접근하지 못하도록 할 수 있게 한다.
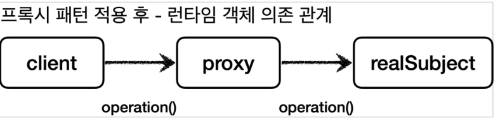
그럼 위와 같은 런타임 객체 의존 관계가 형성 된다.
이것을 보고 코드도 복잡한데 왜 굳이 관심사를 나누고 하는지 의문을 가질 수도 있다. 만약 관심사를 나누지 않고 한 코드 파일에 모두 몰아 놓게 된다면 너무 복잡한 코드에 내가 보고 싶은 부분적인 소스 코드를 찾기 어렵다. 또한 구현체를 의존하지 않고 추상화된 인터페이스에 의존하기 때문에 DIP를 준수하게 된다. 그러므로 최대한 잘게 나누는 습관을 가지도록 하자.
5. 결론
공부하는 김에 알고리즘 + 테스트 코드 + 디자인 패턴을 적용해보았다. 정리하는데 더 시간이 든다. 블로그를 작성하는 게 쉽지 않은데 이번 계기로 습관을 들였으면 좋겠다.